Salasilah · Step-by-step

Getting around a tree

Moving the view, keeping your bearings, and finding one person among hundreds. The first of six guides to the tree workspace — this one is only about looking; nothing here changes your tree.

✎ Draft. Screenshots are auto-generated from the live app (re-runnable). English only for now.

The tree workspace

A tree fills the whole window. Three things are worth knowing before anything else:

  1. The subject — the person the tree is drawn around, named in the top bar and marked with a gold star. Everyone else is positioned relative to them.
  2. The toolbar — what you see (Generations, Show, Theme), who you're looking for (search, Recent), and what you can do (Repair, Export, Share, Add Person).
  3. The nav pad — bottom right, floating over the canvas: zoom, pan, centre, fit and fullscreen.
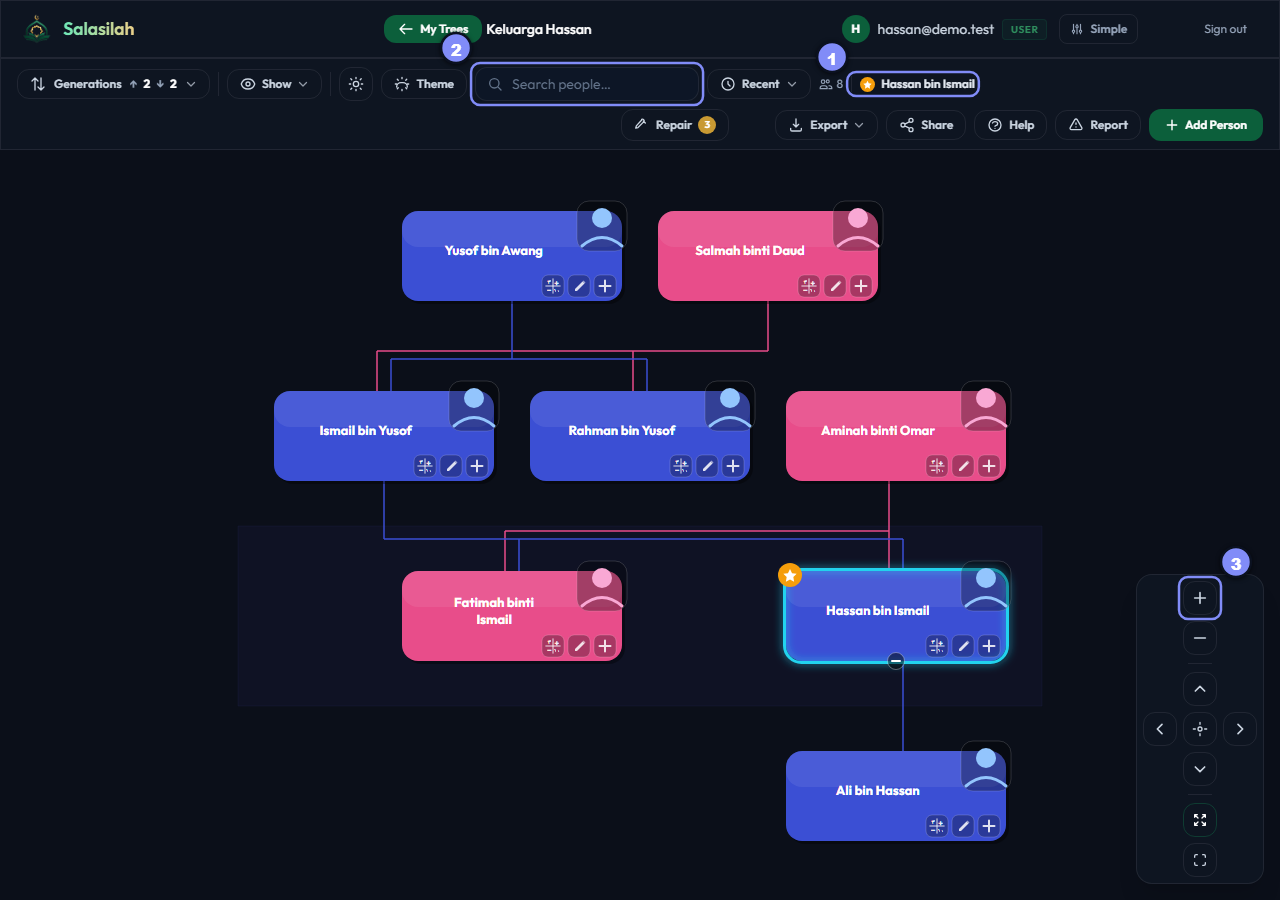
The card with the cyan glow is the focus — the one the arrow keys move. That's different from the subject; see A4.
The tree workspace with the subject, search and nav pad marked
Four generations of one family, drawn around Hassan.
A

Moving the view

Mouse, keyboard, or the nav pad
A1

Drag, scroll and pinch

Before any button: drag the background to move the tree, scroll to zoom, and on a touchscreen pinch. Double-tap or double-click anywhere zooms in on that spot.

Most people never need the nav pad. It's there for precision, for touch devices, and for when you've lost the tree off-screen.

A2

Zoom in and out

The + and buttons at the top of the nav pad step the zoom, which is steadier than a scroll wheel when you want one notch.
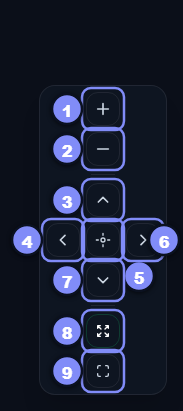
The nav pad with each button numbered
1 Zoom in · 2 Zoom out · 3 Up a row · 4 Previous card · 5 Centre on subject · 6 Next card · 7 Down a row · 8 Fit to screen · 9 Fullscreen — each badge is repeated beside the step that uses it.
A3

Move a row at a time

The cross of arrows walks the tree by relationship, not by pixels: up a row goes to ancestors, down to descendants, and left / right step along the same generation.

The arrow keys do the same, so you can walk a whole family without touching the mouse.

A4

Centre on the subject

Lost? The centre button of the cross — and the subject's name in the toolbar, and the C key — all bring you back to the person the tree is drawn around.

Subject vs focus. The subject (gold star) is who the tree is built around. The focus (cyan glow) is just the highlighted card. Press T to make the focused card the new subject and redraw the tree around them.
The subject name in the toolbar
The subject's name is also a button: click it to re-centre.
A5

Fit the whole tree on screen

Zooms out until everything currently shown fits the window. The quickest way to recover from being lost, and a good way to see the shape of what you've built.

It fits what's displayed — if generations are limited to one up and one down, it fits that, not the whole family.

A6

Fullscreen

Hands the whole screen to the tree, hiding the browser's own bars. Worth it on a laptop, and for showing the tree to someone. Esc returns.

B

Finding a person

Faster than looking
B1

Search people

Type any part of a name and matching people appear beneath. Choose one and the tree moves to them.

Keyboard: P or / jumps straight to this box.

This searches this tree's people. The search on the dashboard searches the names of your trees instead.
The people search box with a partial name typed
Part of a name is enough.
B2

Recently viewed

A short list of people you've recently centred the tree on. Handy when you're moving back and forth between two branches and don't want to search each time.

The Recent button in the toolbar
Recent remembers the subjects you've visited.
B3

Expand a collapsed branch

A card with a small or + beneath it has a branch you can collapse or open; X toggles the focused one. Expand all opens every collapsed branch at once.

Collapsing is only about tidiness — nobody is removed or hidden from the tree itself.